Blogging For Income

A novice blogger and his attempt at generating some income from blogging

The Future Of This Site And Why I Can’t Generate Revenue (Yet)

Posted by JC on October 30, 2006

QuestionMarkWhen I first launched this blog, I had intentions of quickly setting up advertising and a whole slew of other forms of generating revenue through this site. I had a layout all ready and I was going to rapidly build this site through my “Building This Site” series. I had read a great deal about doing this and how WordPress seemed to be the most ideal, most restriction-free way of generating revenue.

Unfortunately, the deeper I looked into adding to this site, the less I found I could do.

Why?

First – the most important thing: I am using WordPress.com.

WordPress.com vs. WordPress.org

Currently I use WordPress.com to create this blog. WordPress.com is a site that allows you to create your own blog, provides hosting for you to do so, and is completely free. Since WordPress.com hosts your blog for you, there are several (and I mean several) restrictions. One of the most important restriction is that WordPress.com does not allow advertising of any kind (because this requires you to add javascript code into your site).

In fact, any outside code is frowned upon when operating a WordPress.com blog. The reason is for security purposes. Since WordPress.com hosts your site for you, things like javascript code and other forms programming may introduce viruses or perhaps even slow down their systems.

So if you are running a blog and your URL for your blog is something like: myblog.wordpress.com, it means your blog is using WordPress.com, which means tough luck – you can’t run advertising of any sort.

So what is WordPress.org? WELL – if you have a domain name and you have found a host for your site, you can get all of WordPress features from WordPress.org. Basically at WordPress.org, you get the complete package of software that allows you to run your own WordPress blog provided you have a host and you have your own domain name.

If you are using the WordPress.org package, it is very versatile and it has many plugins and widgets and gives you the flexability to do anything you really wish to your blog.

Since WordPress is not in charge of hosting your blog, you are free to put anything (javascript and all) into your blog. When you see people talking about how WordPress is great because of all the features and about how they can integrate all kinds of advertising on their blogs, you have to keep in mind: these people have their own domain name and they have their own hosting!

When I first thought of the idea for this site, I was unfortunately duped into using WordPress.com because of all the hype and how all other bloggers were hyping WordPress. Keep in mind that when I was reading articles about making money with your blog, I was still a novice and didn’t have a clue as to the difference between WordPress.com and WordPress.org.

Here is a list of things I cannot do with this WordPress.com blog:

  • I cannot place advertising on this blog
  • I cannot adjust the way this blog looks (i.e. adjust margins, widen sidebars)
  • Certain elements do not work 100% (my SiteMeter counter does not work 100%)
  • I cannot add anything that can analyze the traffic coming to this site (such as Google Analytics, etc)
  • I cannot add certain elements that can help drive traffic to this site (i.e. Diggit, Del.icio.us and Reddit buttons)
  • I cannot add anything that requires you to add code to the blog (which is a lot!)

So What Now?

Since I’ve already put in a lot of time and effort into this blog and since I really like the features that the package from WordPress.org, I will continue with this blog and someday in the future I will transfer this blog onto my own host (I’ve read that doing this is a real pain, but like they say – no pain, no gain!).

I’ll continue adding content to this site (which is a key to any good blog) and once I have an established set of readers and have some good regular traffic coming to the site, I can then start considering moving this blog onto it’s own host. I will continue with my “Building This Site” series, but I will instead focus on what I’m doing to drive traffic (which is still considered building a site) – such things as Technocrati, Fark, Digg, Del.icio.us, etc (don’t worry, I’ll cover these in later posts) .

Over the next several weeks, I’ll be reviewing more things related to blogging including terms and definitions, how to use certain tools, review of certain programming that will be needed and any developments in the blogging arena.

So Why Don’t I Just Use Blogger/Blogspot?

I’ve had some success in generating income from my other Blogger/Blogspot blogs and so comes the question: why didn’t I use Blogger/Blogspot?

I know they currently have a Beta Blogger (a new version of Blogger) that is supposed to have more features than the current existing Blogger, but I still like the wealth of features and the freedom that WordPress has.

And besides, I wanted this blog to be kind of a “learn-as-you-go” type of thing so that readers out there could also follow along.

In the meantime, I hope you bear with me and hopefully we can all learn a lot in the coming weeks!

Posted in Terms & Definitions | 4 Comments »

Building This Site: Day 3 – Modifying Post Counts and Adding Links

Posted by JC on October 27, 2006

Welcome to Day 3 of “Blogging For Income”. The last couple of days I put up some posts mainly for content for this site and I was away for the better part of the week for vacation.

At this point, there isn’t really much else for me to do but to make a few adjustments. From here on in, the main purpose for everything I do with this site will be simply to drive traffic.

But before we do that, I just want to make some minor adjustments to how this site looks. First, I will want to include the number of posts in each of the categories on the left sidebar.

Modifying Post Count

To display the post count of each category, I first went to “Presentation”, then to “Sidebar Widgets”.

CatWid

Next, I clicked on the “Configure” icon just to the right of the widget and I checked “Show Post Counts” on the window that appeared.

CatConf

I also wish to show the post counts in my archives section, so I clicked on the Configure icon in the Archives widget and checked “Show post counts”

ArcConf

With that done, I clicked on Save Changes and now the site will display the number of posts in each category and the number of posts for each month.

PostCount

Adding Links

To complete the look of this site, I’ll add links to a few sites (related to this site) in my Blogroll. My Blogroll is simply a listing of sites that I visit frequently and may be of interest to readers out there.

To add links, I went to “Blogroll”, then I clicked on “Add Link”.

BlogrollAdd

Then I simply added several sites by providing the name of the site, the URL, and a brief description of the site. There are other advanced options (“Link Relationship (XFN)” and “Advanced”), but for my purposes, I’ll leave them alone for now.

And that’s it!

For the next little while, I will be mainly creating content for this site. If I do anything outside of creating content (such as doing something to increase traffic to the site, improve search engine visibility, etc), I will post it up under the “Building This Site” series.

Posted in Building This Site Day-By-Day | Leave a Comment »

Can I Really Make Money Blogging? Part II

Posted by JC on October 21, 2006

MoneyAfter reading some more articles about blogging and advertising on websites, I came across a few more inspirational bloggers and websites.

I came across this article in Business 2.0 that was run earlier this month. The article can be found here and is entitled: “Blogging For Dollars“.

In this article, we found out about these successful bloggers and/or websites that use advertising programs like Google Adsense to make big bucks:

1) Michael Arrington

Michael Arrington runs the very popular TechCrunch blogsite. His blog reviews new technologies and companies and his site brings in enough traffic (1 – 2 million visitors monthly) to rake in about $50,000-$60,000 per month – all pure ad revenues!

2) BoingBoing

A site called BoingBoing, which is simply a blogsite about weird, wacky and wonderful things will recieve almost $1 million in ad revenues this year. That, in itself is a wacky and wonderful thing!

3) PaidContent.org

Another site called PaidContent.org is a site simply about the economics of content. This site will also bring in about $1 million in ad revenues this year.

4) Fark.com

How about this simple site called Fark.com. This site basically has readers submit articles and is really just one big site of links. Simple idea, but a big money maker! They get about 40 million pageviews a month, and they mainly run Googe ads, which makes them a healthy $600,000 – $800,000 per month! How’s that for a simple idea!

5) Markus Finch

I came across several articles about Markus Finch and his site called PlentyOfFish. Markus runs a free online dating service at his site and he mainly runs Google ads for income. And how much income are we talking about? Try $10,000 a day! He gets 600 million pageviews a month and with the revenue he gets from Google Adsense, it’s no wonder he makes his service free. Check out a video of him here when he was featured on a news show.

And so, a few more examples for all of us and more inspiration. Keep in mind that many of these sites have been in operation for several years and when Google Adsense was first introduced back in 2002, these sites were able to take full advantage of the coming advertising wave.

There are currently lots of stats that show that online advertising like Google’s Adsense has just started taking off and will continue to grow at a rapid pace through at least 2010.

So if you’re not blogging, what are you waiting for? I’m in it for the ride and I can’t wait to see how far this wave will take me!

Posted in Inspiration & Success Stories | Leave a Comment »

Can I Really Make Money Blogging?

Posted by JC on October 19, 2006

MoneyThere are probably over 40 million blogs out there today and about 75,000 new ones being created everyday. So then comes the question: can I really make money blogging?

With so much competition out there and everyone trying to grab a piece of the profit pie, this question seems pretty obvious. However, I believe that most of the blogs out there probably don’t have anything of value – hence not many people will visit. Add to that, most blogs are probably updated infrequently, and hence not a good candidate for making money.

But what about those blogs out there that create unique and useful content and that are updated frequently? If you create one of these kind of blogs, is it possible?

Well, I’ve rounded up some of the more successful bloggers out there, all of whom actually do this full-time! You must understand that most bloggers do not really like to disclose how much they make a month (in fact, it’s one of the rules that many advertisers tell people not to disclose).

And so, below are a few of my inspirations for doing this.

1) Amit Agarwal

A professional, full-time blogger from India, his site: Digital Inspiration nets him some healthy income every month. His site reviews the latest and greatest in technology and he has over 1 million visitors a month. With those kinds of numbers, he should be able to make $30,000 – $40,000 monthly just from displaying Google Adsense (an advertiser that puts ads on your site) alone! And this is not the only thing Amit uses to generate income from his site.

In one of his posts, he briefly describes how he’s making money (though he skirts around exact monthly figures), and he shows what kind of traffic his site is generating. The post can be found on his website and is entitled: “How Much Money Do I Make From Adsense And Blogging?”.

Obviously it take a lot of work and a lot of patience to get to Amit’s status. He works hard and is constantly scouring for what’s new and he posts anywhere between 2 and 10 posts a day. The topics he posts is fairly diverse, but as long as it’s technology related, you can be sure Amit has it covered.

Here you can find a video clip of Amit when he was featured on CNN’s IBN show and basically gives you a “day-in-the-life-of” look into how Amit does it.

2) Steve Pavlina

Another full-time blogger, Steve’s site at StevePavlina.com is a personal development site. There is a wealth of articles at his site and covers everything from self-confidence, career, wealth building, and success. He even has a few posts about building a good blog site and ways to increase traffic.

At the beginning of this year, Steve had a little over 700,000 visitors in one month and he predicts he’ll make a little less than $5000 for the month just from his blogsite! Note that he runs several other fairly successful sites, so in reality, he has multiple streams of income and he makes money even when he sleeps!

In one of Steve’s post, he talks about how well his site has grown in 2005 and also shows traffic and Adsense figures. The article can be found on his site and is entitled: “2005 Traffic & Adsense Revenue Growth”.

I’d really recommend you visit his site – not only to see how’s he’s generating all that income, but to really read his articles.

In another post, he covers the basics of creating a great blog and how he did it. The article is entitled: “How To Make Money From Your Blog”.

3) Darren Rowse

Darren is another full-time blogger from down under and really started blogging as a hobby more than anything else. He currently runs ProBlogger.net, which has articles and posts designed to help bloggers make the most out of their blog (i.e. profit from it!).

Darren also runs several other blogs which helps him generate more income. You can read his story about him first being a part-time blogger, then to quitting his job to become a full time blogger here: “Becoming A ProBlogger – A Story In Many Parts”.

ProBlogger also runs advertisements on it’s site, with the bulk of his income coming from Google Adsense.

His ProBlogger site is averaging about 120,000+ visitors a month, and that, in addition to his other blogs he runs, earns him enough to make him six figures a year! In one of his articles, he talks about becoming a six figure blogger – the article is called: “I’m A Six Figure Blogger!”.

He posted up a short article with links that describes what he is using to generate this income. It is called: “How Much Do I Earn From Blogging?”.

And so – there you have it! Three bloggers that are my inspiration. As I come across more successful bloggers, I will file them under the category “Inspiration”.

Posted in Inspiration & Success Stories | 9 Comments »

Web Counters / Web Trackers / Site Trackers

Posted by JC on October 18, 2006

On Day 2 of our “Building This Site” series we added a site tracker called SiteMeter to this blog. So what exactly is a site tracker?

Well, a site tracker or web tracker allows a user to see statistics about the visitors coming to their web-pages or blogs. These tools help you identify trends in your visitors and will give you clues as to whether your site is being seen by the world.

Most site trackers out there offer a variety of statistics and options including (but not limited to):

Detailed Visitor Info
Configurable Counter
Configurable Summary Stats
Popular Pages
Entry Pages
Exit Pages
Referrals
Keyword Analysis
Recent Keyword Activity
Search Engine Referrals
Visitor Paths
Visit Length
Returning Visits
Recent Page-load Activity
Recent Visitor Activity
Country/State/City Stats
Recent Visitor Google Map
ISP Stats
Browser Stats
O.S. Stats
Resolution Stats
JavaScript Stats
Email Reports

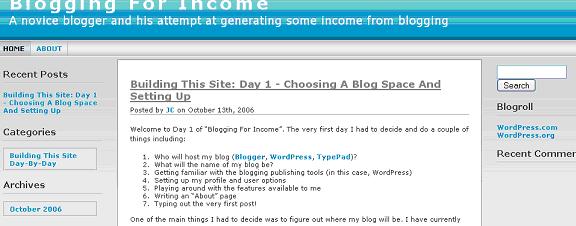
Many site trackers are free and the options and statistics available will vary depending on which one you choose. SiteMeter seems, by far, one of the most popular site trackers. Many blogs and web-pages out there that use SiteMeter allow you to actually click on the Sitemeter icon to see the web traffic they get.

Try it now! Click on the SiteMeter icon on the right side of the page. You will be directed to a page that shows all the stats for this particular blog.

I’ll review with you four different site trackers that you may wish to use for your blog or website. The four I’ll review are: SiteMeter, StatCounter, RiteCounter, and ActiveMeter.

All of these are free, with certain limitations (which I will review) and some have more features and statistics than others. All of the following have additional options and features for an additional fee per month, which I will also review.

Remember, all of the following are free and unless you want extra features, there will be an extra cost per month.

SITEMETER

Perhaps one of the most used site trackers out there, it provides the necessary stats that any blogmaster or webmaster would need. The interface, however looks like something that was made 10 years ago. The stats and reports are not very interactive, but everything one needs to know is displayed.

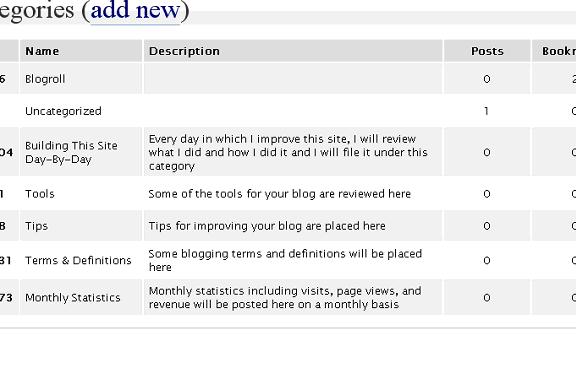
A snapshot of SiteMeter’s main interface and the list of available stats is shown below.

sitemeter_4

From this interface, you can also manage such things as email stats report, privacy level of your counter, and setting your meter style. Below is a sample of the different types of meters that are available with SiteMeter.

Sitemeter3

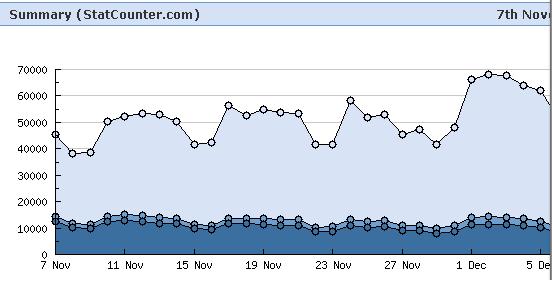
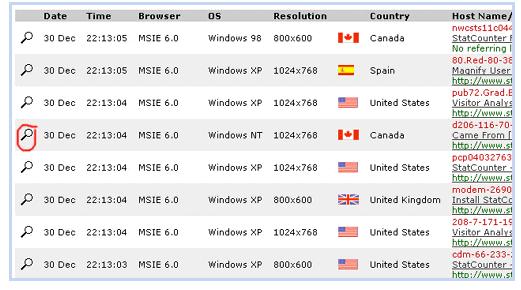
There are several graphs and charts the show you the number of visits and the page views your site is getting. You can even see the details of individual visitors include such things as the OS they are using, what browser they are using, where they came from, what country and city they are from, etc. Below are some sample snapshots of some of the available graphs and charts from SiteMeter (these snapshots were taken from my other blog).

sitemeter1

sitemeter2

SiteMeter is completely free. Just sign up, add in some code to your site, and then you are done! Since SiteMeter is free, there are restrictions and they include:

  • You can only view details (IP, country, OS, browser, etc) of the last 100 visitors
  • You must display the SiteMeter icon or logo somewhere visible on you page
  • You will only have statistics (# of visitors, # page views) for up to a year’s worth of data (anything older than a year is lost)

I didn’t have too many problems using SiteMeter with my other blogs (which are using Blogger/Blogspot), however there are some problems with using SiteMeter with WordPress blogs. Because of security risks, SiteMeter has limited functionality when working with WordPress blogs. You will still get the vital stats like number of visitors and page views, however you will not be able to see where they were referred from, what OS and browser they are using as well as some other detail info about each individual visitor.

If you decided to upgrade and pay either a monthly fee or an annual fee, SiteMeter provides a whole slew of extra statistics, charts, reports, and graphs. Some of these extra features you get with a paid subscription are:

  • Detailed visitor reports for the last 4000 visitors
  • SiteMeter logo and site counter can be set to invisible
  • You can export your stats into a CSV (comma separated value) file
  • You won’t be subjected to ads when you use SiteMeter’s interface
  • Many different other stats including “Referring Pages”, “Referring Search Engines”, “Referring Search Words”, plus many many others
  • You have access to statistics older than 1 year
  • Several types of charts that include moving averages


So how much extra will these extras cost you? If your site has less than 25,000 page views per month, then it’s just $6.95/month or $59/year.

If you think that SiteMeter is right for you, head on over to their site and sign up. They can be found at www.sitemeter.com.

STATCOUNTER

Like SiteMeter, StatCounter offers a variety of free reports and all that’s needed is for you to sign up and add some code to your pages.

One difference I noticed however, is that StatCounter offers many more types of statistics for free than SiteMeter and you are able to export your stats into Excel or a CSV file (SiteMeter will not allow this for free).

The interface looks slick and modern and there is a lot more interactivity with the various charts and graphs.

Here are two sample charts available from StatCounter:

statcounter1

statcounter2

What impressed me most about StatCounter was the number of available features that are available for free. Many of the reports that SiteMeter charges for are available with StatCounter. Here are more screen-shots from StatCounter – the first one shows the details of each visitor while the second one shows referrals by search engine.

statcounter3

statcounter4

One of the neat features about StatCounter is that you can view visitor data using Google Maps and you can pinpoint where your visitors are coming from (if you are interested of course). Below is a snapshot of this feature that is available with StatCounter.

statcounter5

Below is a list of available counters that are available through StatCounter:

statcounter6

Another benefit of StatCounter they offer for free is that they allow you to access LIFETIME statistics (unlike SiteMeter which allows you to only view one year’s worth of data). The free StatCounter displays the details of your last 100 visitors (same as SiteMeter) and allow a maximum of 250,000 page loads per month.

There isn’t much in the way of extra features that you will want to pay for. However, if you’re site is fairly busy and you are really racking up the page-views per month and you want to be able to view the details of more of your visitors, below is the breakdown of the charges for StatCounter:

$9/Month – Details of last 1000 visitors and allows up to 1.5 million page-loads

$19/Month – Details of last 10,000 visitors and allows up to 7.5 million pageloads

$29/Month – Details of last 25,000 visitors and allows up to 15 million pageloads

After reviewing StatCounter and creating this post, I am seriously considering using StatCounter over SiteMeter. If StatCounter sounds like it’s something you would like to use, head on over to their website at: www.statcounter.com and sign up.

ACTIVEMETER

ActiveMeter have basically the same reports that SiteMeter offers, with the only difference being that perhaps the way the stats are presented are a little bit better. One thing I noticed that ActiveMeter provides is that it can potentially identify someone engaging in click fraud. The definition of click fraud taken directly from ActiveMeter’s website is:

“Click fraud is generally defined as a click from a paid ad by someone who has no intention of viewing your web site, and has only clicked to have you charged for the click or to exhaust your PPC budget for the day so that your ads no longer appear (while theirs continue).”
This can potentially help you IF you are paying search engines to advertise your site. In most cases, you won’t have to worry about that.

I have a feeling that this particular site tracker is more for those looking to market their site (either you are selling some services or products) and just from their site, it appears they are catering to that particular market.

Like the other site trackers, they offer some graphs to show visitors and page views. Below is a screenshot.

activemeter1

Like the others, ActiveMeter provides charts, graphs and details of the visitors that come to your site. Below is a screen capture of ActiveMeter showing the details of a recent visitor and a chart showing the breakdown of the OS your visitors are using.

activemeter2

activemeter3

Since ActiveMeter appears to cater to those wishing to market their sites, one of the stats they offer for free is the percentage breakdown of which countries you visitors are coming from.

activemeter4

ActiveMeter also allows you to export your statistics into CSV, Excel or XML format for free, which is another plus. The restrictions to the free version of ActiveMeter is that you are limited to viewing the details (country, OS, browser, length of time on site, etc) of the last 100 visitors to your site. If you are interested in viewing the details of more than the last 100 visitors, ActiveMeter charges the following:

For the last 1000 visitors – $9.95/month

For the last 10,000 visitors – $15.95/month

For the last 50,000 visitors – $35.95/month

So if ActiveMeter interests you, go and visit them at www.activemeter.com and sign up for a free account.

RITECOUNTER

Another site tracker the provides many of the statistics and charts available from other free site trackers. Below is a list of statistics available at RiteCounter.

ritecounter2

One thing that RiteCounter has going for it is that it allows you to view the details (country, OS, browser, etc) of the last 1000 visitors (others limit you to the last 100 visitors). It also allows you to export your stats to Excel for free.

Below is a screen-shot of how some of the stats look like:

ritecounter1

And like the other site trackers, it offers lots of pretty charts and graphs. Below are some screenshots.

ritecounter3

ritecounter4

However, there appears to be a few problems with RiteCounter. Upon browsing their FAQ and forums sections, it appears as though some of the stats that RiteCounter displays are only partial stats and some of the reports they provide are not 100% complete. Upon further investigation, RiteCounter states that this is the best they can offer for free.

Another restriction RiteCounter has is that you are limited to only 6000 page-loads a day. What happens if you have more? They don’t say.

And finally, they have no mention of any pay features or any kind of monthly or annual subscription fees for extra services. To me, this seems kind of strange – almost as if RiteCounter is an incomplete project of sorts. Perhaps it’s because it’s Beta right now (meaning it’s not 100% complete and is still in the testing phase).

But if you are interested, you can check them out at www.ritecounter.com.

OVERVIEW

After this extensive review, I would have to say that my opinions of some of these site trackers have definitely changed.

I originally put SiteMeter on this blogsite simply because I’ve worked with it before and I knew what to expect. However, if I were to rate the four site trackers I’ve reviewed, here’s the order I would consider them by:

  1. StatCounter – simply because of the wealth of stats available for free and the slick interface, plus many of the free features are “paid” features with other site trackers
  2. SiteMeter – this gets the job done and knows that it doesn’t need to be fancy to display stats, very versatile and I’ve had no problems using it in the past
  3. ActiveMeter – nice setup and clean interface, but offers more or less the same features as the others; seems to be more geared towards those wanting to market their site
  4. RiteCounter – quite simply, this is incomplete and I would not recommend it

On the next “Building This Site” post, I will be adding a StatCounter to this page and I’ll keep SiteMeter on this blog for now.

Posted in Tools | 3 Comments »

Building This Site: Day 2 – Creating Categories, Changing The Sidebars, And Adding A Site Counter

Posted by JC on October 14, 2006

Welcome to Day 2 of “Blogging For Income”. Today I will be creating some categories in which I will place my posts in, change the way the sidebars (the areas of the page to the left and right of the main page) look, and add a SiteMeter tool (which will be used as a hit counter and will generate reports about the visitors that visit this site).

Creating Categories

Categories will be used to sort and file the different types of post I will be putting up on this blog. This will allow readers easy access to specific types of posts.

The first thing I did was I logged into WordPress, clicked on the”Manage” tab, and then clicked on “Categories”


cat1b

Scroll down further and you’ll see an area where you can add new categories. I added several new categories which resulted in the following:

Categories 2

Note that if you do not have any posts within a category, the category will not appear on your blog. Now save your settings.

Changing The Category Of A Post

My very first post “Day 1” is currently in the “uncategorized” category. This is not very appealing and I do not wish to have an “uncategorized” category on my blog, so let’s change the category of the first post.

Click on the Manage tab and you should see a listing of all the posts you have created.

Chng1

Click on “Edit” beside the post you wish to change. The post will be brought up and you will see a box called “Categories” on the right hand side.

Chng2

Check the appropriate category you wish this post to appear under and uncheck those you do not wish it to appear. In my case, I unchecked “Uncategorized” and I clicked on “Building This Site Day-By-Day”. Click on “Save” and you’re done!

Changing Your Sidebars

So far, this is how my blog site looks like:

Blog1

This is not how I really want it to look like. I’d like to add a “Recent Posts” section to the left sidebar and I want to remove the “Meta” and “Subscribe” sections on the right sidebar and replace them with a “Recent Comments” section.

Let’s start by clicking on the “Presentation” tab and clicking on “Sidebar Widgets”.

Wid1

You’ll notice that near the middle of the page there are several button-like rectangles that you can drag around on the screen. These are widgets. Each widget represents the information you can add to your sidebars. I’ve dragged and dropped what I want on my sidebars and they now look like this:

Wid2

Click on “Save”. This is what my blog now looks like:

Wid3

There! That’s a little better. But wait! I don’t like the way my links are showing up under “Blogroll”. Let’s go and delete these default links so that later on I can add my own.

To do this, click on the “Blogroll” tab and click on “Manage Blogroll”.

Wid4

Simply check all the checkboxes on the right and click on “Delete Checked Bookmarks”. A pop up will appear – just click OK and you’re done! The links under “Blogroll” are now gone and the “Blogroll” section has disappeared for now (at least until we add new links).

Wid5

Finally, let’s add a site counter that can provide us with daily, monthly, and yearly reports of all the visitors that come to this site!

Adding SiteMeter To Your Site

After taking a look at what’s available out there, I have decided to stick with using SiteMeter. I currently use SiteMeter for my other blogs and I find it very useful in tracking visitors to my site.

First, I went to SiteMeter’s website at: http://www.sitemeter.com

Near the bottom of the page, click on “Sign up for free”. You’ll have to read a couple of their rules so you’ll need to hit the “Next” button a few times.

You will then come to a page that will ask you to enter your website’s URL, the title of your blog, and a codename that you will use with SiteMeter. I signed up with the codename s26blogincome. Make sure you create a codename that is unique to you and something you will remember.

Once you are done, move on to the next page where you will be asked additional information including your email address and country.

On the next page, you will be asked if you wish to subscribe to several newsletters they send via email. Click “Next” if you are not interested.

That’s it! You are done! SiteMeter will then ask you to follow some detailed instructions on how to put the code on your blog site.

Please – DO NOT FOLLOW THE INSTRUCTIONS OUTLINED BY SITEMETER!

Instead, check your email to confirm your SiteMeter account has been created along with your SiteMeter password.

What you want to do now is go back to WordPress and go click on the “Presentation” tab, then on “Sidebar Widgets”. Now look for a widget that is labelled “Text 1”. Drag and drop it on one of your sidebars. I put mine on the right sidebar.

site1

This is a Text Widget and it allows the user to display formatted text or embedded images. Notice the icon on the right side of the widget? Click on it so that we can edit and configure it.

site2
Now, what you’ll need to do is to copy and paste the following code into the Text widget configuration box.

<a href="http://sNN.sitemeter.com/stats.asp?site=sNNyourblogname"><img src="http://sNN.sitemeter.com/meter.asp?site=sNNyourblogname"></a>
The bolded parts of the above code are the things that you have to change. Change them as follows:

  • Check your codename you got from SiteMeter (check your email) to see what is starts with. If it starts with “s25”, then replace the “sNN” to “s25” in the above code
  • In the section that has “site=” replace “sNNyourblogname” with the codename you got from SiteMeter

Once you are done, click the little “x” in the top right hand corner of the Text Widget configuration box. Then click on “Save” and you are done!

Now, after adding that Text Widget, my site now looks like:

final1

We’ve done a lot today, so that should be enough for now. This concludes Day 2 of the Building This Site Day-By-Day series.

Posted in Building This Site Day-By-Day | Leave a Comment »

Building This Site: Day 1 – Choosing A Blog Space And Setting Up

Posted by JC on October 13, 2006

Welcome to Day 1 of “Blogging For Income”. The very first day I had to decide and do a couple of things including:

  1. Who will host my blog (Blogger, WordPress, TypePad)?
  2. What will the name of my blog be?
  3. Getting familiar with the blogging publishing tools (in this case, WordPress)
  4. Setting up my profile and user options
  5. Playing around with the features available to me
  6. Writing an “About” page
  7. Typing out the very first post!

One of the main things I had to decide was to figure out where my blog will be. I have currently have a Blogger (Blogspot) blog and I follow quite a few other blogs out there. From what I have seen, there has been a lot of negativity when it comes to Blogger. Also, there were several blogs that moved from other blog spaces to WordPress.

Flexibility and functionality seems to be the main reason why more and more people are moving their blogs to WordPress. As of this writing, I know that Blogger is in Beta testing of a New Blogger that promises more features.

I do admit that Blogger was fairly easy to use, there are some problems. First of all, there were many times that Blogger would be down or we’d be given notice that Blogger would be down for a specified amount of time. This occurred quite frequently.

Another thing about Blogger was that it made it rather difficult to post up pictures. You had to use other software and what should have been a 1-step process became a 15-step process. Also, Blogger is now owned by Google. This will probably mean that you will be limited with the types of ads you can display or you will be limited to what you can display on your blog.

Finally, I found Blogger to be very limiting in the things you could do. There were several times I wanted to change the way my blog looked or things I wanted to do with my posts (like place tags on them or categorize them), but there was no easy way of doing this.

And so, I decided to go with WordPress. And since this is the first time I am using WordPress, I am truly a novice at this. As I learn more things, I will post them up.

After signing up, I spent maybe an hour or so reviewing and updating my profile and checking out the features of WordPress. I then typed up an “About” page and posted it up. Finally, I deleted initial entry that WordPress puts on your site and I began this post!

From what I’ve done so far, here’s what I like about WordPress:

  • It has a nice slick interface that has drag and drop features – very cool!
  • I like the fact that I can insert images while editing this post – this was something I could not do in Blogger
  • There is a wealth of options – way more than Blogger
  • I love the fact there is an Import and Export feature – this means I can take an existing blog (say from Blogger) and import it into WordPress – very handy!
  • While signing up, WordPress gave me the option of making my blog more visible – with my Blogger blog, I had to manually submit sites to various blog communities

Once I publish this post, I won’t do anything else. On Day 2, I will try to categorize and add tags to this post, add more links on the sidebars and I will add a site counter to this blog.

Posted in Building This Site Day-By-Day | 1 Comment »